This Article will provide an overview of the Instructor Led Training Options available on the Tortal LMS.
Looking to add Live or Virtual classes to your Training programs? Let Tortal bring the classroom experience to your learners with the Instructor Led Training Learning Object.
Live Training is easy to do with the Tortal LMS. We use Learning Objects called Instructor Led Trainings (ILT) to set up this type of Learning experience. Setting up an ILT Learning Object for either In-Person or Virtual use takes a few more steps than adding a video or SCORM Lesson - but is overall a very straightforward and rewarding process.
***Update: 12/2022 - This article contains an overview of the updated User Interface for the ILT Learning Object and Session management Tool.
Article Overview
ILT Learning Objects
ILT Sessions
Managing ILT Sessions & Lessons
ILT Learning Objects
The Instructor Led Training Learning Object (ILT for short) is the trackable container that connects your Live (Virtual or in-Person) Training events to your Tortal Courses.
ILT Learning Objects can have multiple Sessions associated with them, offered in multiple times and locations - just like a real class.
ILT Learning Objects appear on Lesson reports and can be included in Courses in the same way as other Learning Objects.
Creating an ILT Learning Object
1. Click on "Create New Instructor-Led Training"
2. Type a Name for your New ILT Learning Object
Must be unique. If the name is already taken you will get a notification to pick a different one.
3. Enter a Description for your ILT learning Object.
Help identify and define the purpose of this ILT with a clear description.
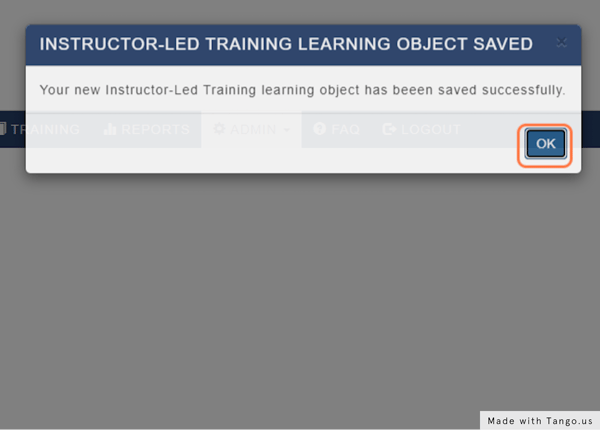
4. Click on "Save Instructor-Led Training" to confirm creation.
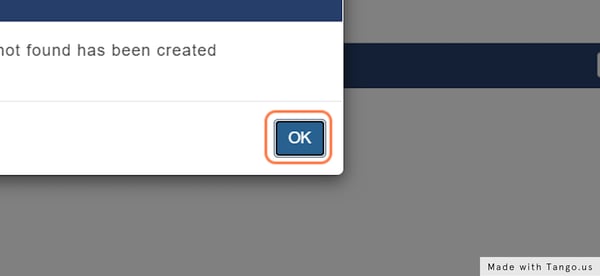
5. Click on OK to go back to the ILT menu.
![in the confirmation popup, click on OK to go back to the ILT menu.](https://support.learning.net/hs-fs/hubfs/Knowledge%20Base%20Import/31520928-5edb-4e45-97ba-fb8142d4ae9d.png?width=600&name=31520928-5edb-4e45-97ba-fb8142d4ae9d.png)
Editing an ILT Learning Object
1. Find the Learning Object you would like to alter - Click on "Edit Title/Descr."
2. Update the Name and/or Description
3. Click on Save Instructor-Led Training to confirm changes.
4. Click on OK in the confirmation modal.
![Click on OK in the confirmation modal.](https://support.learning.net/hs-fs/hubfs/Knowledge%20Base%20Import/1941d378-9eee-4c68-aa7c-3d5e45d6689f.png?width=600&name=1941d378-9eee-4c68-aa7c-3d5e45d6689f.png)
Deleting an ILT Learning Object
1. Locate the Management controls for ILT Learning Objects.
![Locate the Management controls for ILT Learning Objects.](https://support.learning.net/hs-fs/hubfs/Knowledge%20Base%20Import/66f4f976-f845-4db0-8f87-3b5af4d34f5c.png?width=600&name=66f4f976-f845-4db0-8f87-3b5af4d34f5c.png)
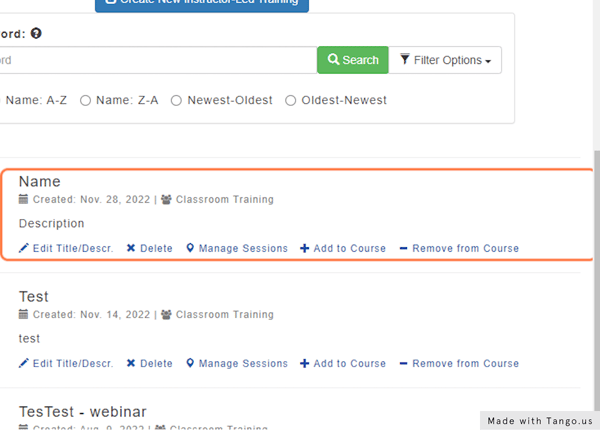
2. Click on "Delete" for the Learning Object you wish to remove.
![Click on "Delete" for the Learning Object you wish to remove.](https://support.learning.net/hs-fs/hubfs/Knowledge%20Base%20Import/a1b1c0de-2ab7-495b-974e-6b35ff2c3d44.png?width=600&name=a1b1c0de-2ab7-495b-974e-6b35ff2c3d44.png)
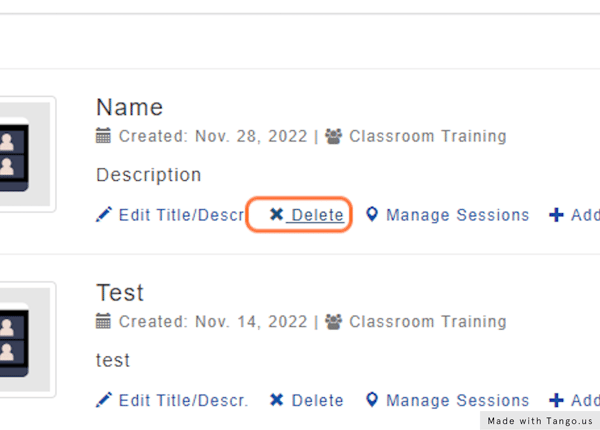
3. Click on OK - this action cannot be undone.
![Click on OK - this action cannot be undone.](https://support.learning.net/hs-fs/hubfs/Knowledge%20Base%20Import/1a49c101-a9b7-416a-b7b6-f6176361e7b9.png?width=600&name=1a49c101-a9b7-416a-b7b6-f6176361e7b9.png)
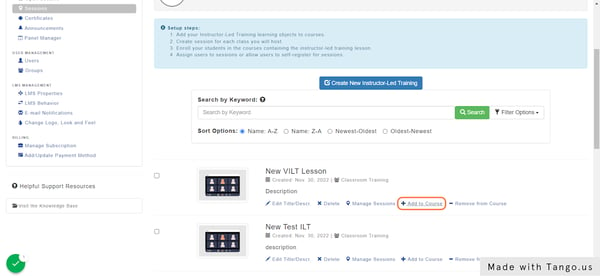
Attaching/Removing an ILT to/from a Course
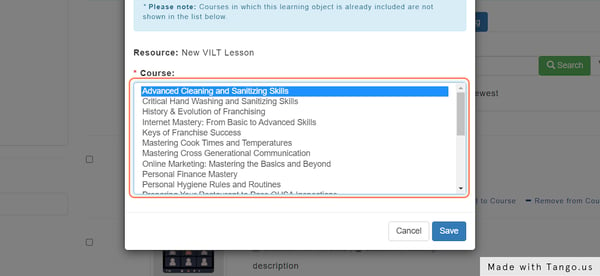
1. To Add an ILT to a Course - Click "Add to Course"
![To Add an ILT to a Course - Click "Add to Course"](https://support.learning.net/hs-fs/hubfs/Knowledge%20Base%20Import/58efb114-48a5-4c2a-85fa-dcae4bd9cff5.png?width=600&name=58efb114-48a5-4c2a-85fa-dcae4bd9cff5.png)
2. Select your Course from the List, and click save to Confirm
Courses available are listed by Catalog Management Access.
![Select your Course from the List, and click save to Confirm](https://support.learning.net/hs-fs/hubfs/Knowledge%20Base%20Import/0e4e9ba1-9c78-42bb-8426-83234ca9f349.png?width=600&name=0e4e9ba1-9c78-42bb-8426-83234ca9f349.png)
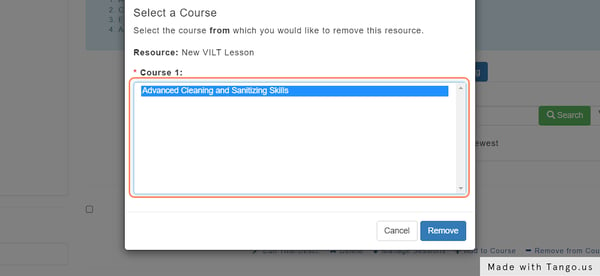
3. To Remove a Learning Object from a Course - Click on "Remove from Course"
![To Remove a Learning Object from a Course - Click on "Remove from Course"](https://support.learning.net/hs-fs/hubfs/Knowledge%20Base%20Import/c6011fc3-3d54-40ca-8d1f-baabd49ac2d5.png?width=600&name=c6011fc3-3d54-40ca-8d1f-baabd49ac2d5.png)
4. Select the Course to remove the Learning Object from, from the List of Course where it is applied - click "Remove" to confirm.
![Select the Course to remove the Learning Object from, from the List of Course where it is applied - click "Remove" to confirm.](https://support.learning.net/hs-fs/hubfs/Knowledge%20Base%20Import/6a758bc8-c62f-4f1d-98bd-768ad64580ea.png?width=600&name=6a758bc8-c62f-4f1d-98bd-768ad64580ea.png)
ILT Sessions
ILT Sessions are the actual scheduled classes associated with Each ILT Learning Object. Each session cna be set up for different times, locations, and venues according to needs. The sections below highlight how to handle the basics steps for working with ILT Sessions.
All Session connected to an ILT Learning Object can be managed by clicking the "Manage Sessions" Link for the ILT Learning Object.
Creating an ILT Session
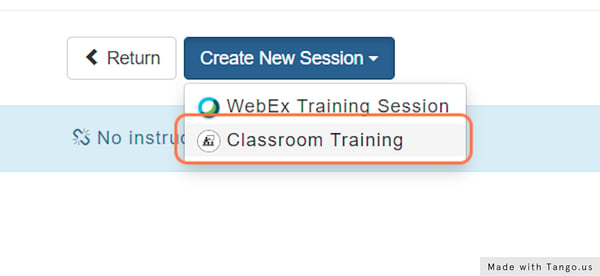
1. Click on Create New Session
![Click on Create New Session](https://support.learning.net/hs-fs/hubfs/Knowledge%20Base%20Import/f3cbe20a-2327-429a-9ee5-baa5c4c7dcaa.png?width=600&name=f3cbe20a-2327-429a-9ee5-baa5c4c7dcaa.png)
2. Select the Type of Session to create
Tortal currently supports full integration with WebEx, with full integrations support for other Virtual Platforms on the way.
To create a Virtual Session with Zoom, MSTeams, Loom or other services - choose Classroom Training.
![Select the Type of Session to create](https://support.learning.net/hs-fs/hubfs/Knowledge%20Base%20Import/25b38283-b3e0-4e31-a18a-a2e36e1259b8.png?width=600&name=25b38283-b3e0-4e31-a18a-a2e36e1259b8.png)
3. Give your new Session a name
Naming Conventions vary across organization, we recommend coming up with a naming convention that allows for easy alphabetizing and location in other lists - such as in the Reporting Area.
![Give your new Session a name](https://support.learning.net/hs-fs/hubfs/Knowledge%20Base%20Import/a1dfa14c-a8d0-4dbe-940d-c6f90feec1a5.png?width=600&name=a1dfa14c-a8d0-4dbe-940d-c6f90feec1a5.png)
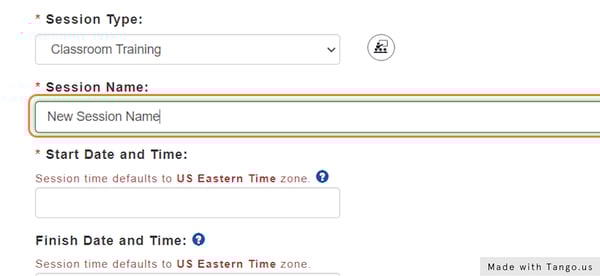
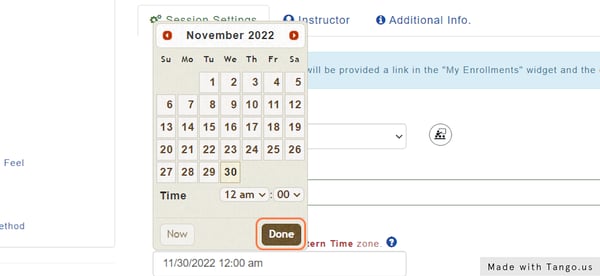
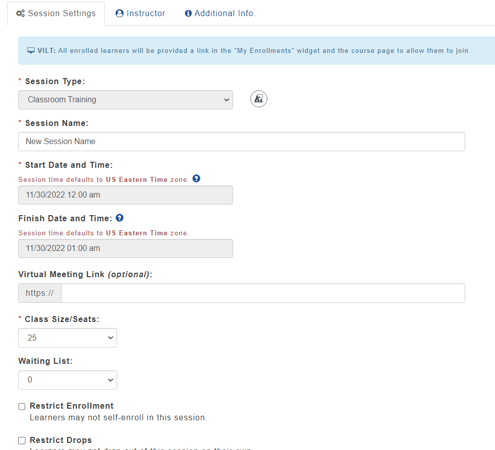
4. Select a Start Date and Time to show the Date Picker.
![Select a Start Date and Time to show the Date Picker.](https://support.learning.net/hs-fs/hubfs/Knowledge%20Base%20Import/a84349d6-acd2-4ae6-83cf-5f654d4b33ab.png?width=600&name=a84349d6-acd2-4ae6-83cf-5f654d4b33ab.png)
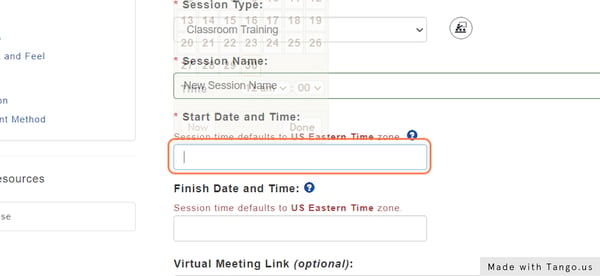
5. Select your Date and time - and click Done to save
![Select your Date and time - and click Done to save](https://support.learning.net/hs-fs/hubfs/Knowledge%20Base%20Import/501eaa43-0fe6-4e95-bed2-54d934b33dc5.png?width=600&name=501eaa43-0fe6-4e95-bed2-54d934b33dc5.png)
6. Add a Virtual meeting Link to your Session.
Virtual meeting links can be collected from your Virtual Meeting program of choice and applied here to give your students access to the Virtual training space.
![Add a Virtual meeting Link to your Session.](https://support.learning.net/hs-fs/hubfs/Knowledge%20Base%20Import/268cc6b4-07c3-4ef9-9d35-21fe2eaf6fd2.png?width=600&name=268cc6b4-07c3-4ef9-9d35-21fe2eaf6fd2.png)
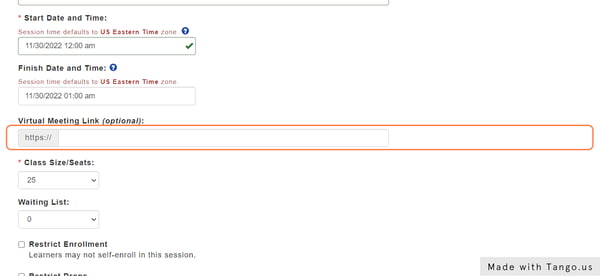
7. Set the Class size, and optionally, the Waiting list size
![Youc an set the Class size, and the waiting list size](https://support.learning.net/hs-fs/hubfs/Knowledge%20Base%20Import/2e4ef7a2-9ee7-45b7-b67a-d48af063d913.png?width=600&name=2e4ef7a2-9ee7-45b7-b67a-d48af063d913.png)
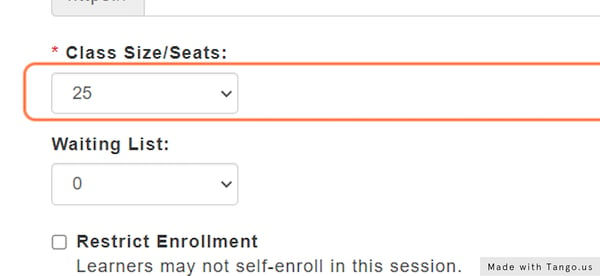
8. You can also configure options to add more control to User Session Registration and Drops.
![You can also configure options to add more control to User Session Registration and Drops.](https://support.learning.net/hs-fs/hubfs/Knowledge%20Base%20Import/0ec4d8b2-5a6b-46bc-b6ab-8631a578a3c2.png?width=600&name=0ec4d8b2-5a6b-46bc-b6ab-8631a578a3c2.png)
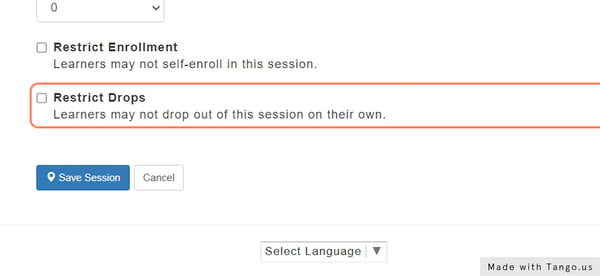
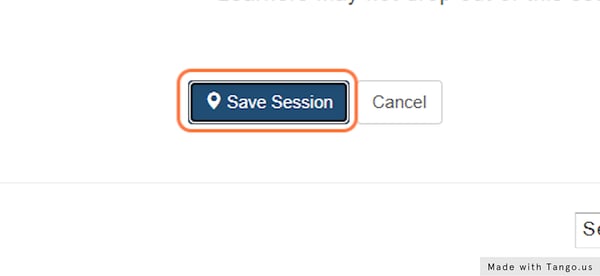
9. Click on Save Session to confirm your Changes to this session
![Click on Save Session to confirm your Changes to this session](https://support.learning.net/hs-fs/hubfs/Knowledge%20Base%20Import/048b52fe-e585-4ef4-81b2-49acf7e010b1.png?width=600&name=048b52fe-e585-4ef4-81b2-49acf7e010b1.png)
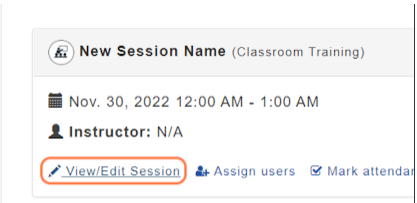
Editing an ILT Session
1. Click on View/Edit Session for the Session you wish to Edit
![mceclip1.png](https://support.learning.net/hubfs/Knowledge%20Base%20Import/11030952972045.png)
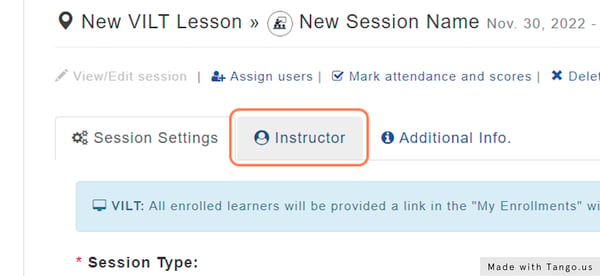
2. Use the 3 tabs to navigate between the different sections of Session Information
![Use the 3 tabs to navigate between the different sections of Session Information](https://support.learning.net/hs-fs/hubfs/Knowledge%20Base%20Import/75f3410e-850b-47d5-a78e-a607f2eb2aa2.png?width=600&name=75f3410e-850b-47d5-a78e-a607f2eb2aa2.png)
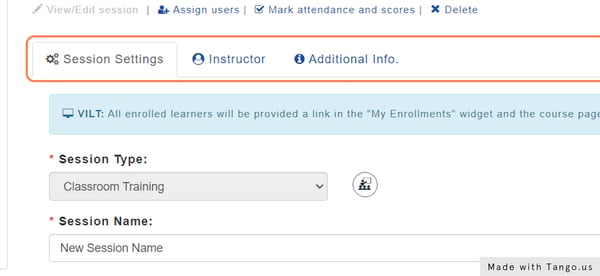
3. Session Information - You can update any of the Basic Session information created during setup.
![mceclip2.png](https://support.learning.net/hs-fs/hubfs/Knowledge%20Base%20Import/11030995712909.png?width=495&height=450&name=11030995712909.png)
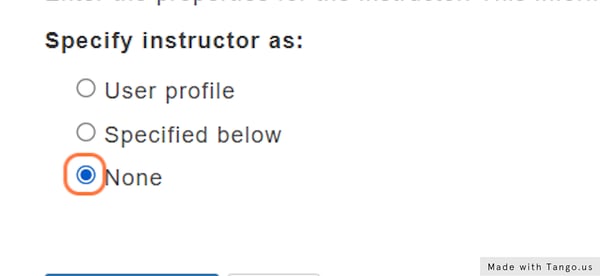
4. Click on Instructor to include information about the Instructor or Contact Person for this Class Session
![Click on Instructor to include information about the Instructor or Contact Person for this Class Session](https://support.learning.net/hs-fs/hubfs/Knowledge%20Base%20Import/5579184a-a8a3-4a76-8750-9b3d1f57f84b.png?width=600&name=5579184a-a8a3-4a76-8750-9b3d1f57f84b.png)
5. You may include a User Account currently in Tortal.
Search your User List for an Instructor or contact, and add them to this Session
![You may include a User Account currently in Tortal.](https://support.learning.net/hs-fs/hubfs/Knowledge%20Base%20Import/d5a66e98-7baa-489f-82fd-00f8e4b23d5f.png?width=600&name=d5a66e98-7baa-489f-82fd-00f8e4b23d5f.png)
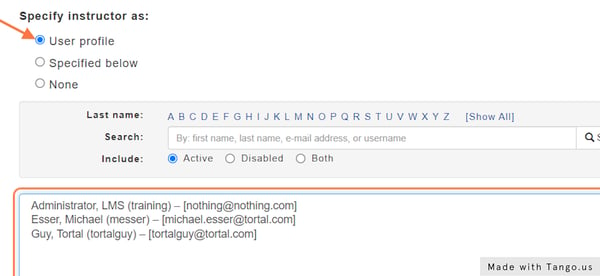
6. You can also Include any Contact not in Tortal - manually enter their information here.
![You can also Include any Contact not in Tortal - manually enter their information here.](https://support.learning.net/hs-fs/hubfs/Knowledge%20Base%20Import/14c71e2a-c565-4e44-9a5e-322f23e41b08.png?width=600&name=14c71e2a-c565-4e44-9a5e-322f23e41b08.png)
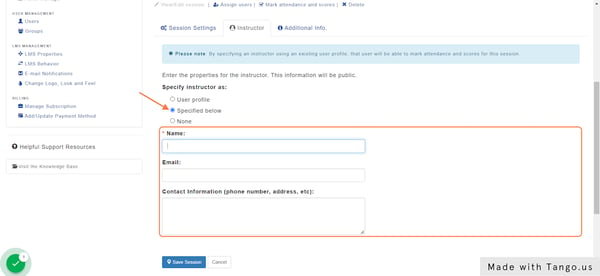
7. You can also choose to not include any Instructor Info.
![You can also choose to not include any Instructor Info.](https://support.learning.net/hs-fs/hubfs/Knowledge%20Base%20Import/ac466701-016b-477e-97d2-93658e2dadc4.png?width=600&name=ac466701-016b-477e-97d2-93658e2dadc4.png)
8. Click on Additional Info tab to add any helpful Session details for your Learners.
![Click on Additional Info tab to add any helpful Session details for your Learners.](https://support.learning.net/hs-fs/hubfs/Knowledge%20Base%20Import/34b1679c-59b8-4b11-b8eb-337d5f9e9eb8.png?width=600&name=34b1679c-59b8-4b11-b8eb-337d5f9e9eb8.png)
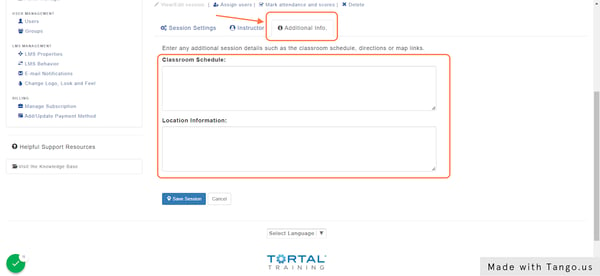
9. Click on the Save Session button to confirm and save all changes.
![mceclip3.png](https://support.learning.net/hubfs/Knowledge%20Base%20Import/11031013076109.png)
Deleting an ILT Session
1. Click on Delete - for the Session you wish to delete
![Click on Delete - for the session you wish to delete](https://support.learning.net/hs-fs/hubfs/Knowledge%20Base%20Import/3385d168-f195-42c0-8e08-c12e986812a2.png?width=600&name=3385d168-f195-42c0-8e08-c12e986812a2.png)
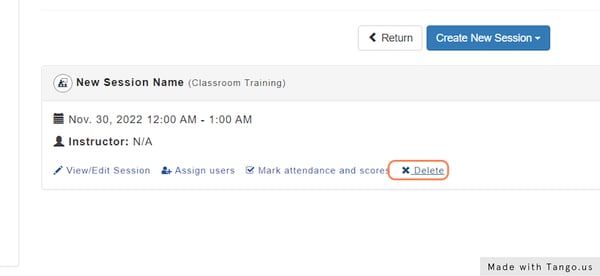
2. A modal will appear to confirm the effects of this deletion.
Learners who are currently signed up for this session will need to be re-enrolled in an alternate Session. This is not automatic. There is no notification sent out.
![A modal will appear to confirm the effects of this deletion.](https://support.learning.net/hs-fs/hubfs/Knowledge%20Base%20Import/0e8b8c48-348b-4861-9a73-7661130a3eb7.png?width=600&name=0e8b8c48-348b-4861-9a73-7661130a3eb7.png)
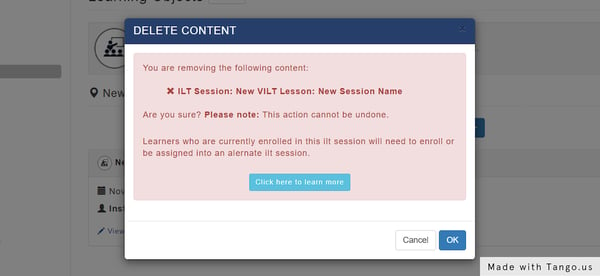
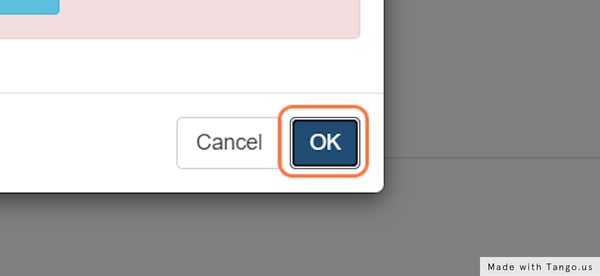
3. Click on OK to confirm and Delete.
![Click on OK to confirm and Delete.](https://support.learning.net/hs-fs/hubfs/Knowledge%20Base%20Import/23e92eb5-bee7-4e3c-83b7-c962f71ed0be.png?width=600&name=23e92eb5-bee7-4e3c-83b7-c962f71ed0be.png)
Managing ILT Sessions & Lessons
Live training is inherently fluid. Classes change locations, times, and instructors as a matter of course. Tortal ILT Sessions are built to accommodate these diversions easily. See below for Steps to basic Session management.
Enrolling Users into Sessions
To Enroll Users into a Session - 3 conditions must first be met:
-
The ILT Learning Object holding this MUST be Added to a Course.
-
Users MUST have a Current Enrollment in this Course.
IF these conditions are not met you will see this info box
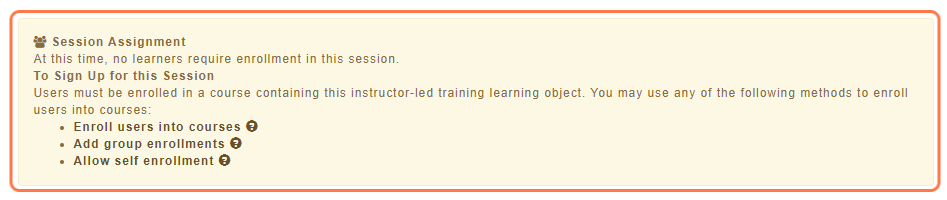
Once these prerequisites are met Users can sign up for their own Sessions or be Assigned by an Admin using the process below.
Assigning Users to ILT Sessions
If choosing to Assign users to Sessions Manually, this is how you do it.
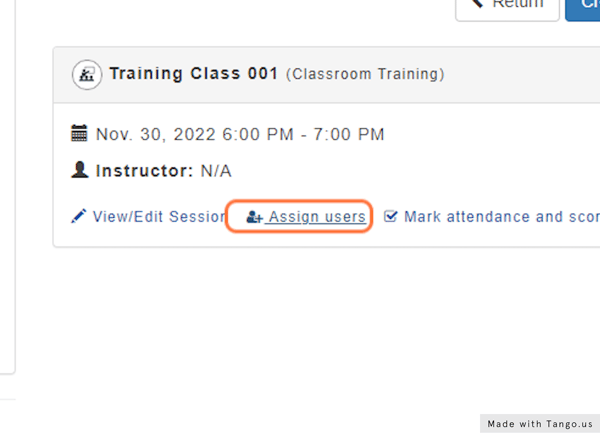
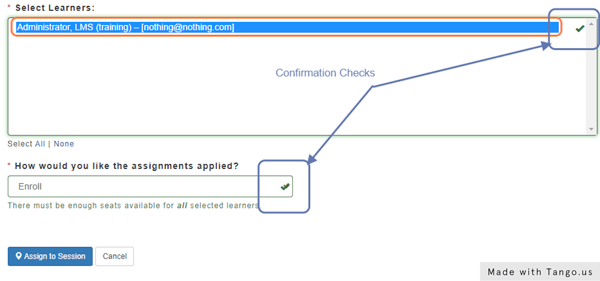
1. Click on "Assign users" - For the Session you wish to assign Users to
![Click on "Assign users" - For the Session you wish to assign Users to](https://support.learning.net/hs-fs/hubfs/Knowledge%20Base%20Import/54538fd4-4281-4f74-ad0c-aeb6985cfd56.png?width=600&name=54538fd4-4281-4f74-ad0c-aeb6985cfd56.png)
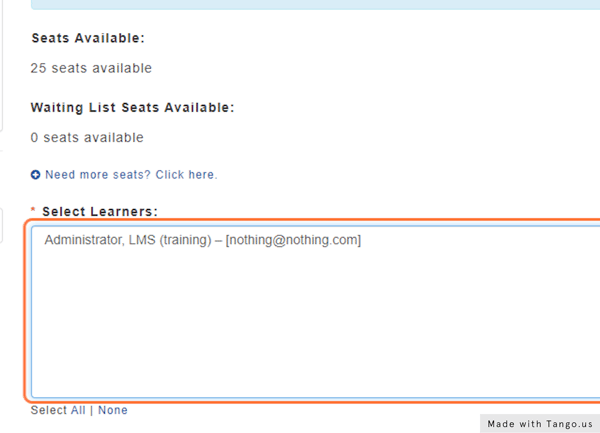
2. Select your Learners from the List
You can use the Quick Select links ( "All" | "None" ) or combos Ctrl+ Click or Shift+Click to quickly manage User Selection.
![Select your Learners from the List](https://support.learning.net/hs-fs/hubfs/Knowledge%20Base%20Import/c3737e3b-b09c-41ee-8d1d-f2ea9261b17e.png?width=600&name=c3737e3b-b09c-41ee-8d1d-f2ea9261b17e.png)
3. Click on your action from the list - Enroll from How would you like the assignments applied?
Enroll - User will be Enrolled in a Seat for that Session
Add to WaitList - Users will be added to the Waitlist.
![Click on your action from the list - Enroll from How would you like the assignments applied?](https://support.learning.net/hs-fs/hubfs/Knowledge%20Base%20Import/5504f1cc-b5c1-478f-8ae0-6c6d831932ab.png?width=600&name=5504f1cc-b5c1-478f-8ae0-6c6d831932ab.png)
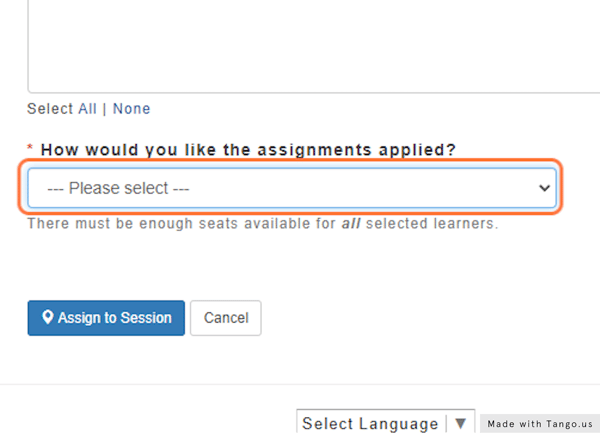
4. Click on "Assign to Session" to confirm Actions
![Click on "Assign to Session" to confirm Actions](https://support.learning.net/hs-fs/hubfs/Knowledge%20Base%20Import/2f839370-14d5-4c2d-a0ca-d1b25ccea575.png?width=600&name=2f839370-14d5-4c2d-a0ca-d1b25ccea575.png)
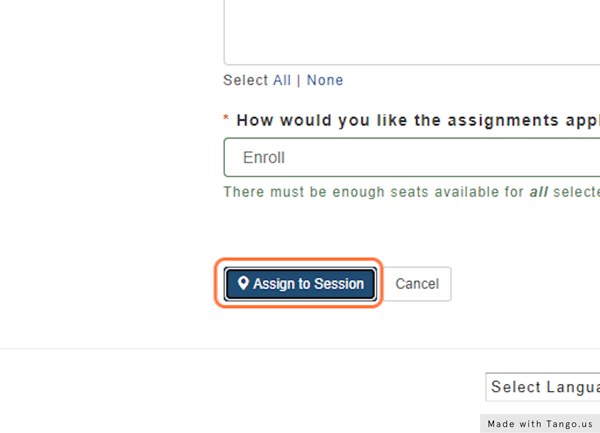
5. Confirmation Checks will appear next to the Users when the Enrollments of waitlists have completed.
![Confirmation Checks will appear next to the Users when the Enrollments of waitlists have completed.](https://support.learning.net/hs-fs/hubfs/Knowledge%20Base%20Import/32742d04-a723-4d4b-b29c-771cf3a84dd3.png?width=600&name=32742d04-a723-4d4b-b29c-771cf3a84dd3.png)
Managing ILT Session Rosters
Once Session classes have finished Administrators and Instructors have abilities to mark attendance for Credit, Award scores for in-person exams, and other roster abilities.
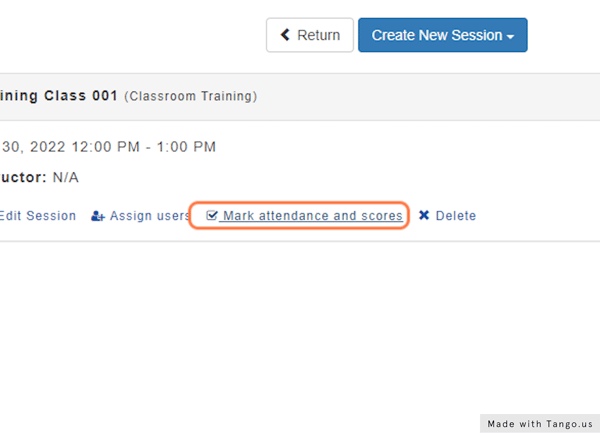
1. Click on "Mark attendance and scores" for the Session yo wish to manage
![Click on "Mark attendance and scores" for the Session yo wish to manage](https://support.learning.net/hs-fs/hubfs/Knowledge%20Base%20Import/04123579-2125-4c82-b8d0-5f6f530511a1.png?width=600&name=04123579-2125-4c82-b8d0-5f6f530511a1.png)
2. The tabs Allow you to switch between Enrolled and Wait List Lists.
![The tabs Allow you to switch between Enrolled and WaitlIst Lists.](https://support.learning.net/hs-fs/hubfs/Knowledge%20Base%20Import/809b4036-5751-4bc0-99e5-3746646358d7.png?width=600&name=809b4036-5751-4bc0-99e5-3746646358d7.png)
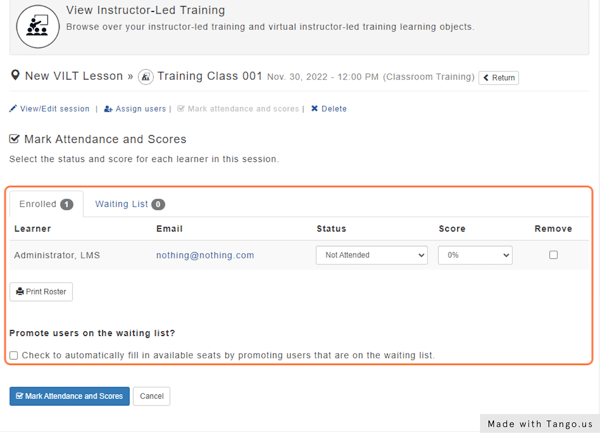
3. Each Enrollee can be marked for Attendance Status.
-
Attended / Not Attended